Background
I always dreamed of installing NixOS on my MacBook Air 2017, driven by my strong preference for Linux. Upon realizing it was possible, I knew I had to make the switch. The transition was highly educational, and these are the steps/pitfalls that I encountered on that journey.
Installation
Attempt 1 - Initial Failure
With the minimal NixOS ISO downloaded, I quickly flashed the image onto a usb drive while on MacOS:
dd if=latest-nixos-minimal-x86_64-linux.iso of=/dev/disk2 bs=4M status=progress
I then plugged it into my MacBook and held down the “option” key while rebooting in order to enter the boot manager of my laptop. Upon doing so, I was greeting with two entries, one for the familiar MacOS Ventura operating system called “Macintosh HD”, and a new entry titled “EFI Boot”. Much to my dismay, however, the new entry was grayed out and could not be clicked on, forcing me to boot into MacOS after about 10 seconds.
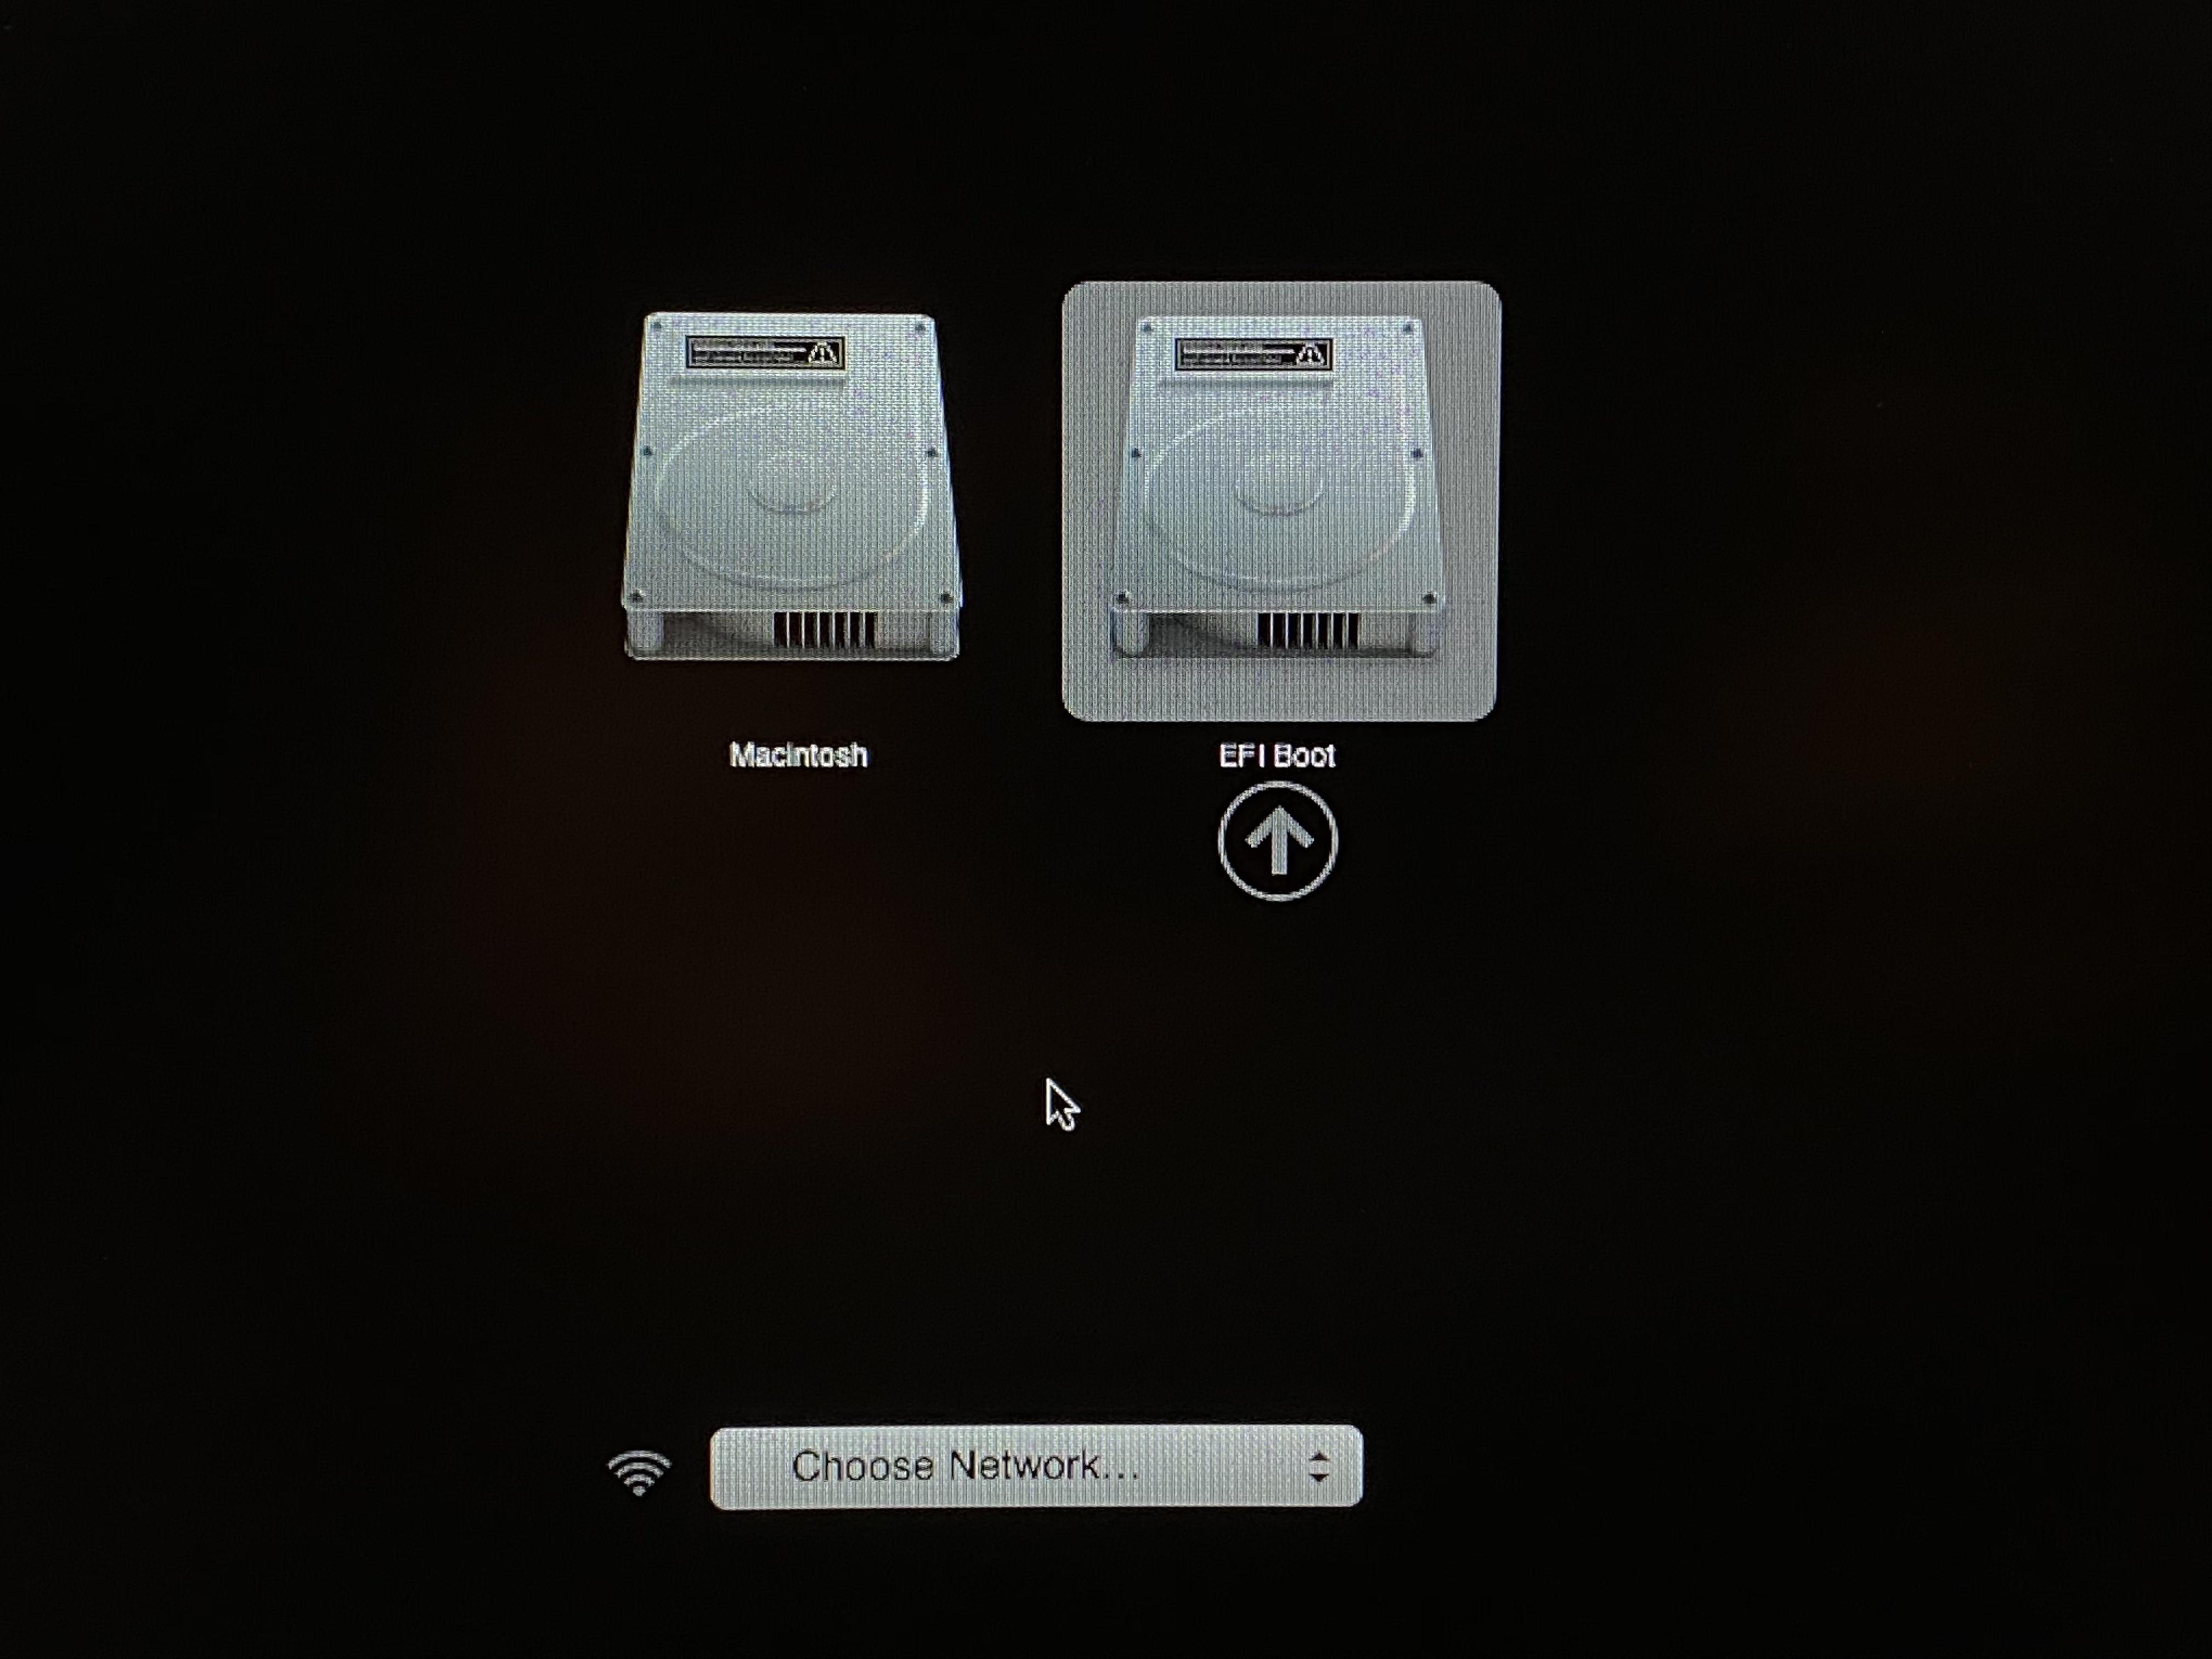 Note: not my image, taken from this Reddit post
Attempt 2 - Bypassing Apple’s safeguards
After a bit of research, I learned that I was unable to boot up from an external drive due to safeguards Apple placed on their laptops, (predating 2018 or so). Thankfully, fixing the issue was not too difficult.
I learned from this forum that by I can enter a recovery menu by holding down CMD-R while booting up my laptop. In this menu, there is an application called the “Startup Security Utility”. Starting this application caused a graphical window to open up. It only had a couple of options in it that could be toggled by radio buttons. The one I wanted was called “Allow booting from external media”, which I selected before rebooting.
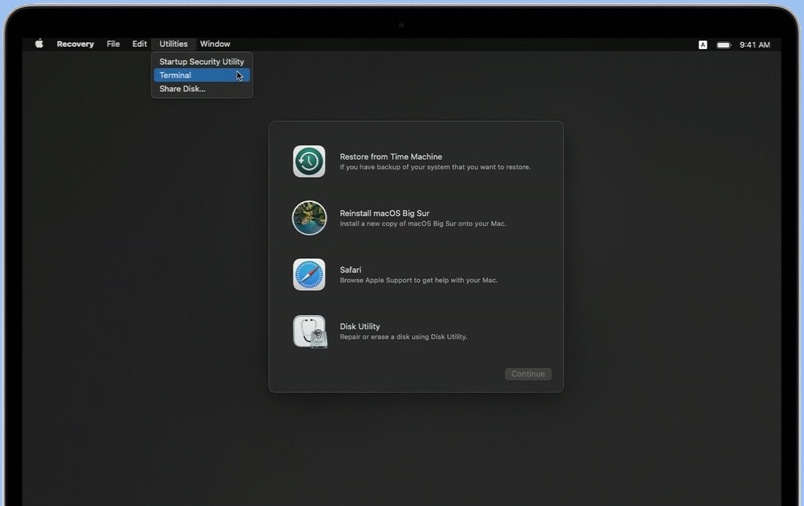 Note: image courtesy of iBoysoft
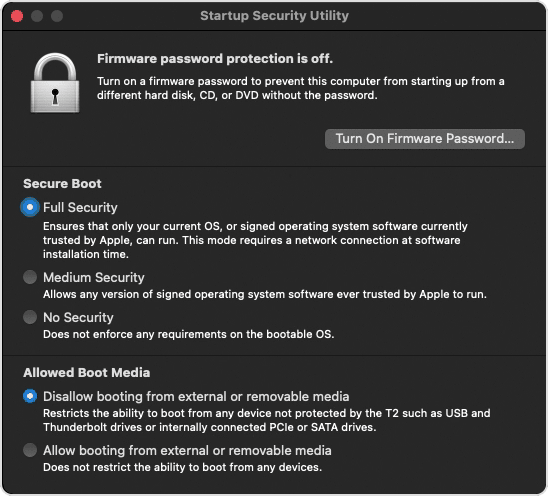 Note: image courtesy of Apple support
With “Allow booting from external or removable media” toggled, I was successfully able to boot up into a TTY interface on NixOS at long last. And, unfortunately, here is where the true pain began: The minimal NixOS ISO does not come with the necessary drivers to use the Broadcom WiFi chip installed in my system. With no WiFi connection and no Ethernet ports, I was stuck.
Attempt 3 - Installing from a custom image
I won’t bore you with details, but I went through lots of trial and error trying to get an internet connection on my machine. Some people online reported being able to gain internet access by connecting their macbook to their iPhone with a USB and using the phone’s hotspot, but on NixOS this is only possible with the libimobiledevice package installed, which I did not have and needed an internet connection to get.
Others online mentioned installing the necessary drivers via a flash drive, (that is I would need to download and setup the drivers on a secondary USB drive, connect it to my macbook while in the NixOS TTY, and use GNU utilities to install the drivers from the 3rd drive to the 2nd drive, and install everything on the second drive onto the MacBook’s hard drive). I tried to accomplish this for hours on end, but kept running into bizarre kernel errors that offered no insight and I could find little to no resources online for what I was trying to accomplish, (largely since it was so hardware specific). I was close to giving up when I stumbled upon this blog post.
While the hardware in the post was different from mine, it was an epiphany. Through the power of Nix declaritive interopability, I could create my own custom NixOS ISO easily that is finetuned for my architecture. I used the Apple recovery menu to boot back into MacOS, and quickly installed a minimal image of NixOS in a virtual machine.
Once in the VM, I threw together the following file, which I named iso.nix, following tutorials online:
{ config, pkgs, ... }:

{
  imports = [
    <nixpkgs/nixos/modules/installer/cd-dvd/installation-cd-minimal.nix>
  ];

  nixpkgs.config.allowUnfree = true; # necessary because the Broadcom chips require unfree firmware
  boot.kernelModules = [ "wl" ];
  boot.extraModulePackages = [ config.boot.kernelPackages.broadcom_sta ]; # this installs the actual drivers for WiFi
  boot.blacklistedKernelModules = [ "b43" "bcma" ];
}
I then ran the command sudo nix-build '<nixpkgs/nixos>' -A config.system.build.isoImage -I nixos-config=iso.nix, waited 10-15 minutes, and soon I had my own iso file in the same directory.
I flashed the custom ISO to my USB drive from within the VM, (which required some permissions changes to be able to access external media), and with the new drive I rebooted my laptop, booted into the new image, and was magically greeted with a NixOS TTY environment with internet access!
$ ping 8.8.8.8
PING 8.8.8.8 (8.8.8.8) 56(84) bytes of data.
64 bytes from 8.8.8.8: icmp_seq=1 ttl=114 time=30.0 ms
64 bytes from 8.8.8.8: icmp_seq=2 ttl=114 time=26.6 ms
From there, I cloned my NixOS configuration flake from GitHub, formatted the disk, and installed NixOS.
The entire installation took about 45 minutes, and by the time it was done, my MacBook booted up into a fully functional and beautiful NixOS system. Everything functioned seamlessly and to this day I am satisfied with my system.
Note 1 (August 2025):
I recently underwent this process again, but booting into the installation media the same way as before did not offer me a network connection as expected. Instead, I had to tailor the installer nix file as follows:
{ config, lib, pkgs, ... }:

{
  imports = [
    <nixpkgs/nixos/modules/installer/cd-dvd/installation-cd-minimal.nix>
  ];

  networking.networkmanager.enable = true;
  networking.wireless.enable = lib.mkForce false;
  environment.systemPackages = with pkgs; [
    b43Firmware_5_1_138
    wirelesstools
    networkmanagerapplet
  ];

  nixpkgs.config.allowUnfree = true; # necessary because the Broadcom chips require unfree firmware
  boot.kernelModules = [ "wl" ];
  boot.extraModulePackages = [ config.boot.kernelPackages.broadcom_sta ]; # this installs the actual drivers for WiFi
  boot.blacklistedKernelModules = [ "b43" "bcma" ];
}
Note 2 (August 2025):
For archiving purposes, this is what the last step used to say (when I used channels instead of managing everything in flakes):
From there, I quickly set up my new operating system using basic unix utilities included in the minimal installer:
$ sudo fdisk /dev/sda
Welcome to fdisk (util-linux 2.37.2).
Changes will remain in memory only, until you decide to write them.
Be careful before using the write command.

Command (m for help): g
Created a new GPT disklabel (GUID: 4649EE36-3013-214E-961C-51A9187A7503).

Command (m for help): n
Partition number (1-128, default 1):
First sector (2048-500118158, default 2048):
Last sector, +/-sectors or +/-size{K,M,G,T,P} (2048-500118158, default 500118158): +500M
Created a new partition 1 of type 'Linux filesystem' and of size 500 MiB.

Command (m for help): t
Selected partition 1
Partition type (type L to list all types): 1
Changed type of partition 'Linux filesystem' to 'EFI System'.

Command (m for help): n
Partition number (2-128, default 2):
First sector (209717248-625142414, default 209717248):
Last sector, +/-sectors or +/-size{K,M,G,T,P} (209717248-625142414, default 625142414):
Created a new partition 2 of type 'Linux filesystem' and of size 198 GiB.

Command (m for help): w
The partition table has been altered.
Syncing disks.

$ lsblk
NAME   MAJ:MIN RM   SIZE RO TYPE MOUNTPOINTS
sda      8:0    0   200G  0 disk
├─sda1   8:1    0   500M  0 part
└─sda2   8:2    0 198.5G  0 part

$ sudo mkfs.fat -F 32 /dev/sda1
$ sudo fatlabel /dev/sda1 NIXBOOT
$ sudo mkfs.ext4 /dev/sda2 -L NIXROOT
$ sudo mount /dev/disk/by-label/NIXROOT /mnt
$ sudo mkdir -p /mnt/boot
$ sudo mount /dev/disk/by-label/NIXBOOT /mnt/boot
$ sudo dd if=/dev/zero of=/mnt/.swapfile bs=1024 count=2097152
2097152+0 records in
2097152+0 records out
2147483648 bytes (2.1 GB, 2.0 GiB) copied, 10.0312 s, 214 MB/s
$ sudo chmod 600 /mnt/.swapfile
$ mkswap /mnt/.swapfile
Setting up swapspace version 1, size = 2 GiB (2147479552 bytes)
no label, UUID=4649EE36-3013-214E-961C-51A9187A7503)
$ swapon /mnt/.swapfile
$ sudo nixos-generate-config --root /mnt
With the drive partitioned and the file systems set up, I downloaded my NixOS configuration file which I had written within a VM and stored in GitHub. I then set up the channels I was planning on using and installed the new operating system:
$ sudo nix-channel --add https://nixos.org/channels/nixos-unstable
$ sudo nix-channel --add https://github.com/nix-community/home-manager/archive/master.tar.gz home-manager
$ sudo nix-channel --update
$ sudo nixos-install